Rental LED display Novastar software setting manual, novastudio,NovaCT
Novastar setting steps:
1, Installation
Firstly please unzip the installation package "NovaLCT V5.2.0.zip", then double-click
"NovaLCT V5.2.0.exe" and follow the installation wizard to complete the software
installation. If the firewall prompt appears, please select to allow the installation.
2, Login in
Step 1: Open NovaLCT and choose User > Advanced Synchronous System User Login.
Step 2: Enter the password for logging in the terminal, and click Login.
The default password is "admin". If the login is successful, the interface below will
appear, as shown in Figure 2-1.
Figure 2-1 Successful login interface
3, Screen Configuration Using System Configuration Files
The advantage of using system configuration files to configure LED displays is that
the configuration procedure is very simple and easy, and no manual configuration
operation is required.
Step 1: Click on the main interface: Screen Configuration, and the Screen Configuration window pops up as shown in Figure 3-1.
Step 2: Set the Current Operation Communication Port.
l If the control computer is connected to the synchronous system with one line,
the communication port that the software defaults to is the current
communication port.
l If the control computer is connected to multiple synchronous systems with
different lines, please choose the corresponding communication port of the
synchronous system to be configured.
Step 3: Select the Load Config File option, use the Browse button to select the system
configuration file to be loaded.
Step 4: Click Next. The selected configuration file will be automatically loaded to the LED display system. The LED display system will have been configured when the load
operation is finished.
4, Screen Connection
Select Screen Connection page in the Screen Configuration window (Figure 4-1).
Enter screen number (number of the LED displays to be configured) and click
Configure button, The default screen configuration page (page for standard LED
display configuration) will displayed, as shown in Figure 4-1.
Figure 4-1 Screen connection
Quantity
This is the number of LED displays that are to be configured.
l Configure
This button is used to load the Screen Number to the NovaLCT application.
l Read form HW
This is used for the application to read the LED display information from the
hardware.
l Detect Communication Status
This is used to check whether the communication within the current LED display
is good.
l Read the Number of Receiving Cards
Get the number of receiving cards loaded by each of the Ethernet ports of the
current sending card.
l Enable Mapping (only supported by some receiving cards of the Armor series)
When this function is opened, current serial number of the cabinet and its
Ethernet port No. will be shown on the cabinet.
l Load from File
Load screen information files save on control computer.
l Save to File
This is used to save screen information files as screen information file (*.scr).
l Send to HW
This is used to send the LED display configuration settings to the connected
sending card.
l Restore Factory Settings
Reset current parameter configuration to factory settings.
l Restore System Configuration
Reset current operating status of the system (or sending card, or receiving card)
to the status in the backup file.
l Back Up System Configuration
Back up current configuration parameters.
l Save System Configuration File
Save system configuration parameters as a file.
l Save This is used to save the settings to a FLASH chip. The saved data won’t be lost even the hardware is powered off.
This all steps.
LINSN CONTROL SYSTEM
How to install and set up LED studio software with LED curtain quickly ?
--Pls download from: https://www.dropbox.com/s/pvlwwg9jb5ffy1b/NEW-LINSN-LED%20STUDIO%20SETUP.rar
The software you used must be the newest model.
Note: (Important)
1, The VGA card of your computer must be setup to clone or copy model;
2, Computer display resolution: 1024 by 768
LED studio setup steps: 1. Install the LED studio (serial number:888888);
2.open the soft ware: LED studio
3. click: option
4.choose: software setup;
5. input " linsn" directly(when you see the software setup windows);
6. input password: 168.
7.click: Receiver;
8. click: Load from files;
9. load the "RCG" files I supply for you. Pls email me to get one: huasuntech@aol.com
10.click: Send to receiver; click: OK;
11.click:Save on receiver.
If you use 2 or more receiving card with Led curtain screen, pls follow:
1. Install the LED studio (serial number:888888);
2.open the soft ware: LED studio
3. click: option
4.choose: software setup;
5. input " linsn" directly(when you see the software setup windows);
6. input password: 168.
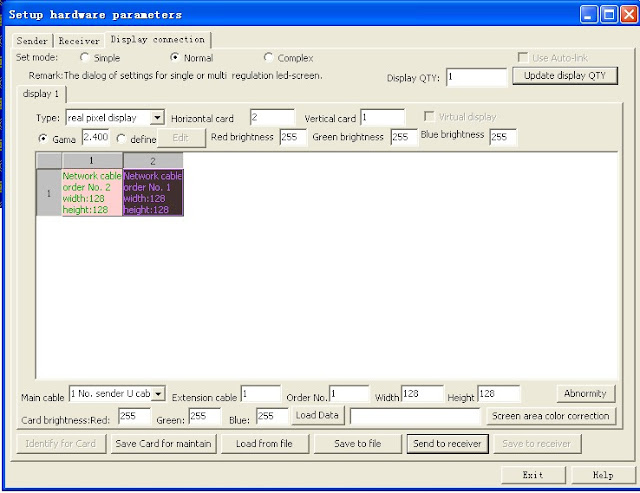
7.click: Display connection
8. click: Load from files;
9. load the "CON" files I supply for you. CON file size is the size of your curtain pixel or pls find setup photo below:

Or get CON file by yourself, Just setup for a few number according to curtain pixel:
1, horizontal card number:
2,vertical card number;
3,pixel number of each card; like 2.56 meter for 20mm, pixel number is 128,then put in 128
4.click: Send to receiver; click: OK;
5.click:Save on receiver.


